GeoWave EMR Quickstart Guide: AWS Environment Setup Guide
What you will need
-
-
Not necessary if you are in the us-east-1 region
-
-
AWS CLI setup on your local machine (optional)
-
Not needed if you plan on using the EMR GUI to create the cluster
-
Creating the Cluster
We will be using the GeoWave bootstrap script to provision our cluster. Then we will walk through the CLI commands to download, ingest, analyze and visualize the data.
Bootstrap Scripts
GeoWave currently supports the use of several key/value stores. We provide EMR bootstrap scripts for Accumulo, HBase, and Cassandra and the others are vendor hosted. Choose the appropriate script for the key/value store you’d like to use when setting up your cluster. The bootstrap scripts help to set up GeoWave and your environment. Click on any of the links below to download the script.
-
For Accumulo use: s3://geowave/2.0.1/scripts/emr/accumulo/bootstrap-geowave.sh
-
For HBase use: s3://geowave/2.0.1/scripts/emr/hbase/bootstrap-geowave.sh
-
For Cassandra use: s3://geowave/2.0.1/scripts/emr/cassandra/bootstrap-geowave.sh
These scripts will provide you with everything necessary to complete this guide, but can also be used to setup GeoWave for use in other workflows. There are scripts available for each of the releases of GeoWave going back to 0.9.3. These can be used by replacing /2.0.1/ with the desired release (i.e. /0.9.3/)
|
We have also provided quickstart scripts that will perform all of the steps in this guide automatically. This will allow you to verify your own steps, or test out other GeoWave commands and features on an already conditioned data set. If you would prefer to have all of the steps run automatically, please use these bootstrap scripts instead of the ones listed previously:
|
To use one of the scripts listed above, it must be accessible from an s3 bucket. Because buckets are region specific, you may not be able to use our geowave bucket if your cluster is not deployed in the us-east-1 region. In this case, you will need a personal bucket in your region that contains the desired script. Instructions on creating and uploading to an s3 bucket can be found in the appendices.
AWS CLI Method
This is the basic makeup of the command you will call to create your GeoWave test cluster. All variables, designated as ${VARIABLES}, will need to be be replaced with your individual path, group, value, etc. An explanation of each of the variables is given below the command.
aws emr create-cluster \
--name ${CLUSTER_NAME} \
--instance-groups InstanceGroupType=MASTER,InstanceCount=1,InstanceType=m4.xlarge InstanceGroupType=CORE,InstanceCount=${NUM_WORKERS},InstanceType=m4.xlarge \
--ec2-attributes "KeyName=${YOUR_KEYNAME},SubnetId=${YOUR_SUBNET_ID},EmrManagedMasterSecurityGroup=${YOUR_SECURITY_GROUP},EmrManagedSlaveSecurityGroup=${YOUR_SECURITY_GROUP}" \
--release-label ${EMR_VERSION} \
--applications Name=Hadoop Name=HBase \
--use-default-roles \
--no-auto-terminate \
--bootstrap-actions Path=s3://{Your_Bucket}/{Path_To_Your_Script},Name=Bootstrap_GeoWave \
--tags ${YOUR_TAGNAME} \
--region ${YOUR_REGION} \-
${CLUSTER_NAME}- The name you want to show up in the Cluster list in AWS-
Example:
geowave-guide-cluster
-
-
${NUM_WORKERS}- The number core/worker nodes you want-
You will be working with the relatively small amount of data in this walkthrough so we recommend using two
-
-
${YOUR_KEYNAME}- The name of the key value pair you want to use for this cluster-
Example:
geowave-guide-keypair -
If you have not created a keypair for this cluster please follow the steps here.
-
-
${YOUR_SUBNET_ID}- The subnet id linked with your security group(s)-
Example:
subnet-bc123123 -
If you are unsure of which subnet to use please see the VPC (network interface/subnet id) section here.
-
-
${YOUR_SECURITY_GROUP}- This is the security group(s) you want the cluster to be assigned to.-
Example:
sg-1a123456 -
If your AWS EMR account has default security groups setup you can leave the
EmrManagedMasterSecurityGroupandEmrManagedSlaveSecurityGroupout of--ec2-attributes -
If you are unsure of which groups to use here please see the EC2 Security Group section here.
-
-
${EMR_VERSION}- The version of EMR that you want to use for your cluster-
Example:
emr-5.7.0
-
-
${Your_Bucket}- The name of the bucket that you created in s3. This is the home to your script.-
Example:
geowave-guide-bucket
-
-
${Path_To_Your_Script}- The path to the script that you are planning to use-
Example:
scripts/hbase/bootstrap-geowave.sh -
Info on the bootstrap scripts and their locations can be found above
-
-
${YOUR_TAGNAME}- Tag name for the cluster you are creating-
Example:
geowave-guide -
The
--tagsis completely optional, but may help you search for this cluster if there are many on the AWS account you are using
-
-
${YOUR_REGION}- Your AWS region-
Example:
us-east-1
-
-
Spot Instances
-
You can opt to use spot instances to save money by adding
BidPricein your--instance-groupsline. Info and current pricing on spot instances can be found here. The new line should look something like:--instance-groups InstanceGroupType=MASTER,InstanceCount=1,InstanceType=m4.xlarge,BidPrice=${Bid_Price} InstanceGroupType=CORE,InstanceCount=${NUM_WORKERS},InstanceType=m4.xlarge,BidPrice=${Bid_Price} \
-
If your create-cluster command was successful it will return the ClusterId of your cluster, otherwise you will receive a
message detailing why the command failed.
For more information on the create-cluster command please see the AWS documentation here.
|
The return of a |
Please view the Connecting to the Cluster section of this document for description of how to connect to your provisioned cluster.
|
If you used the quickstart version of bootstrap script the script will now setup the environment, then download and process one month of GDELT data. The entire process takes approximately 25 minutes on a three node cluster. |
AWS GUI Method
Login to AWS and select EMR from the Services drop down menu.

Select the “Create Cluster” button in the top left side of the page. Once the Create Cluster application opens select the “Go to advanced options” link at the top of the page.
Step 1:
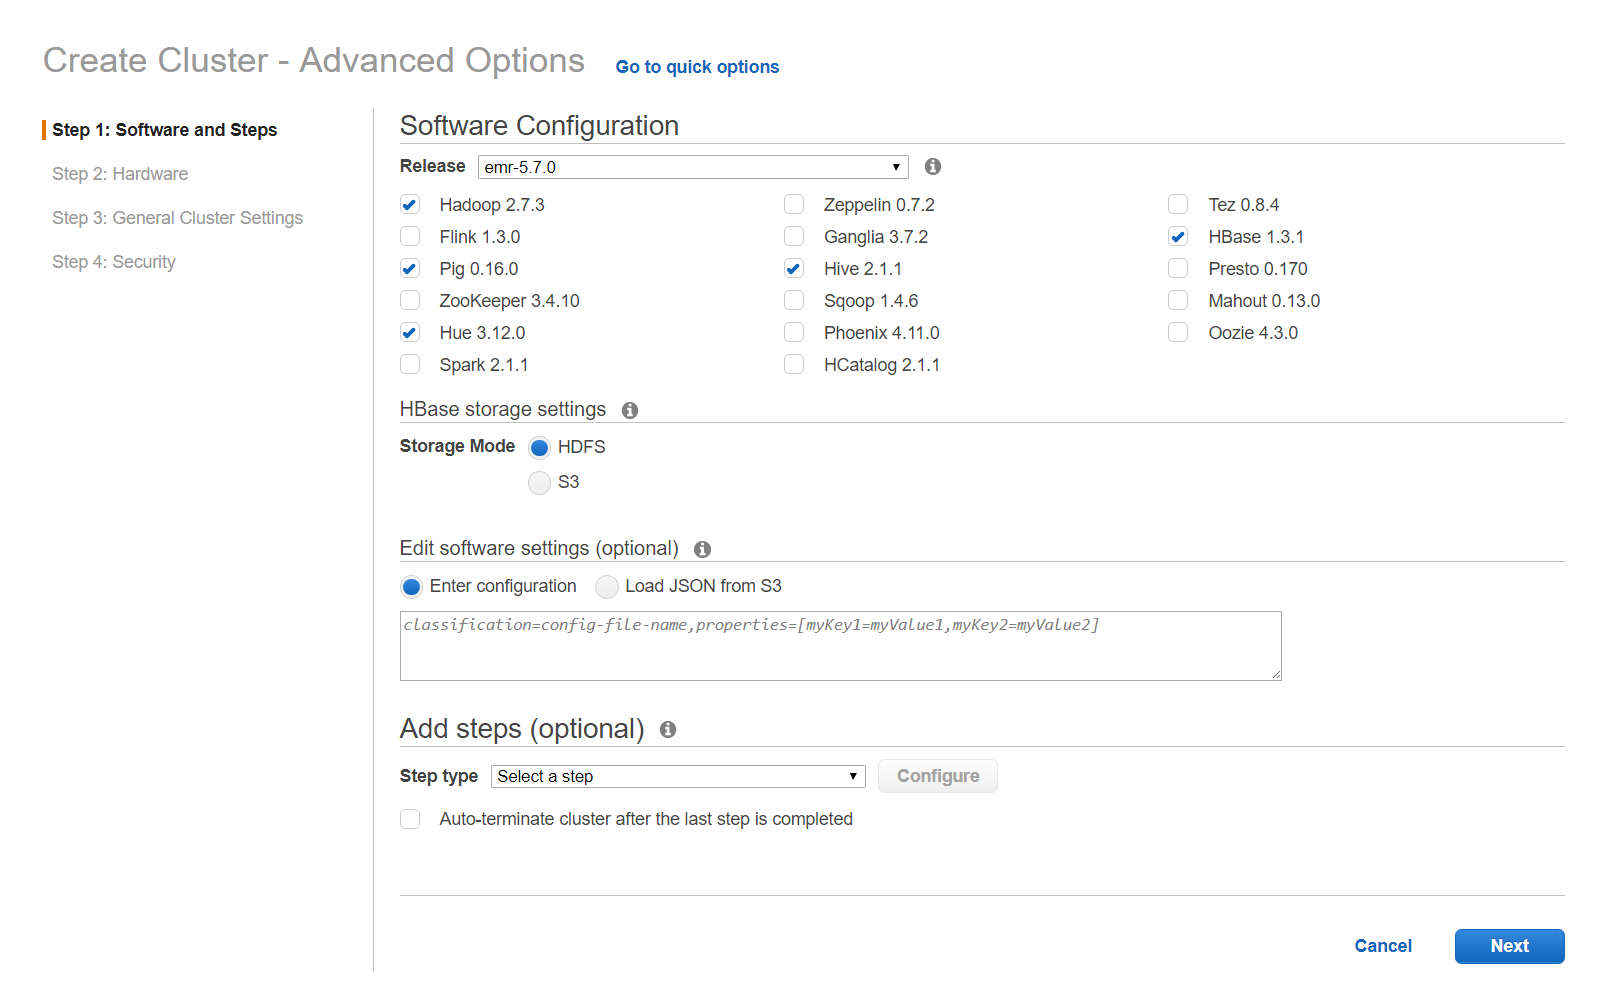
Software Configuration
-
Release
-
Select
emr-5.17.0from the dropdown list (older versions of GeoWave may not support all functions on newer versions of EMR and vice versa but you can likely choose different EMR versions without any issues - at the time of writing EMR 5.17.0 was the latest) -
Ensure Hadoop is selected
-
If you are using HBase you will need to select it here
-
It won’t hurt to have other software selected as well, but they aren’t needed for this guide
-
-
Storage Mode
-
Select HDFS for simplicity although GeoWave-HBase can use S3 effectively as well
-
-
Edit software settings
-
Don’t touch anything here
-
Add Steps
-
We won’t be adding any steps for this quickstart guide
---
Step 2:
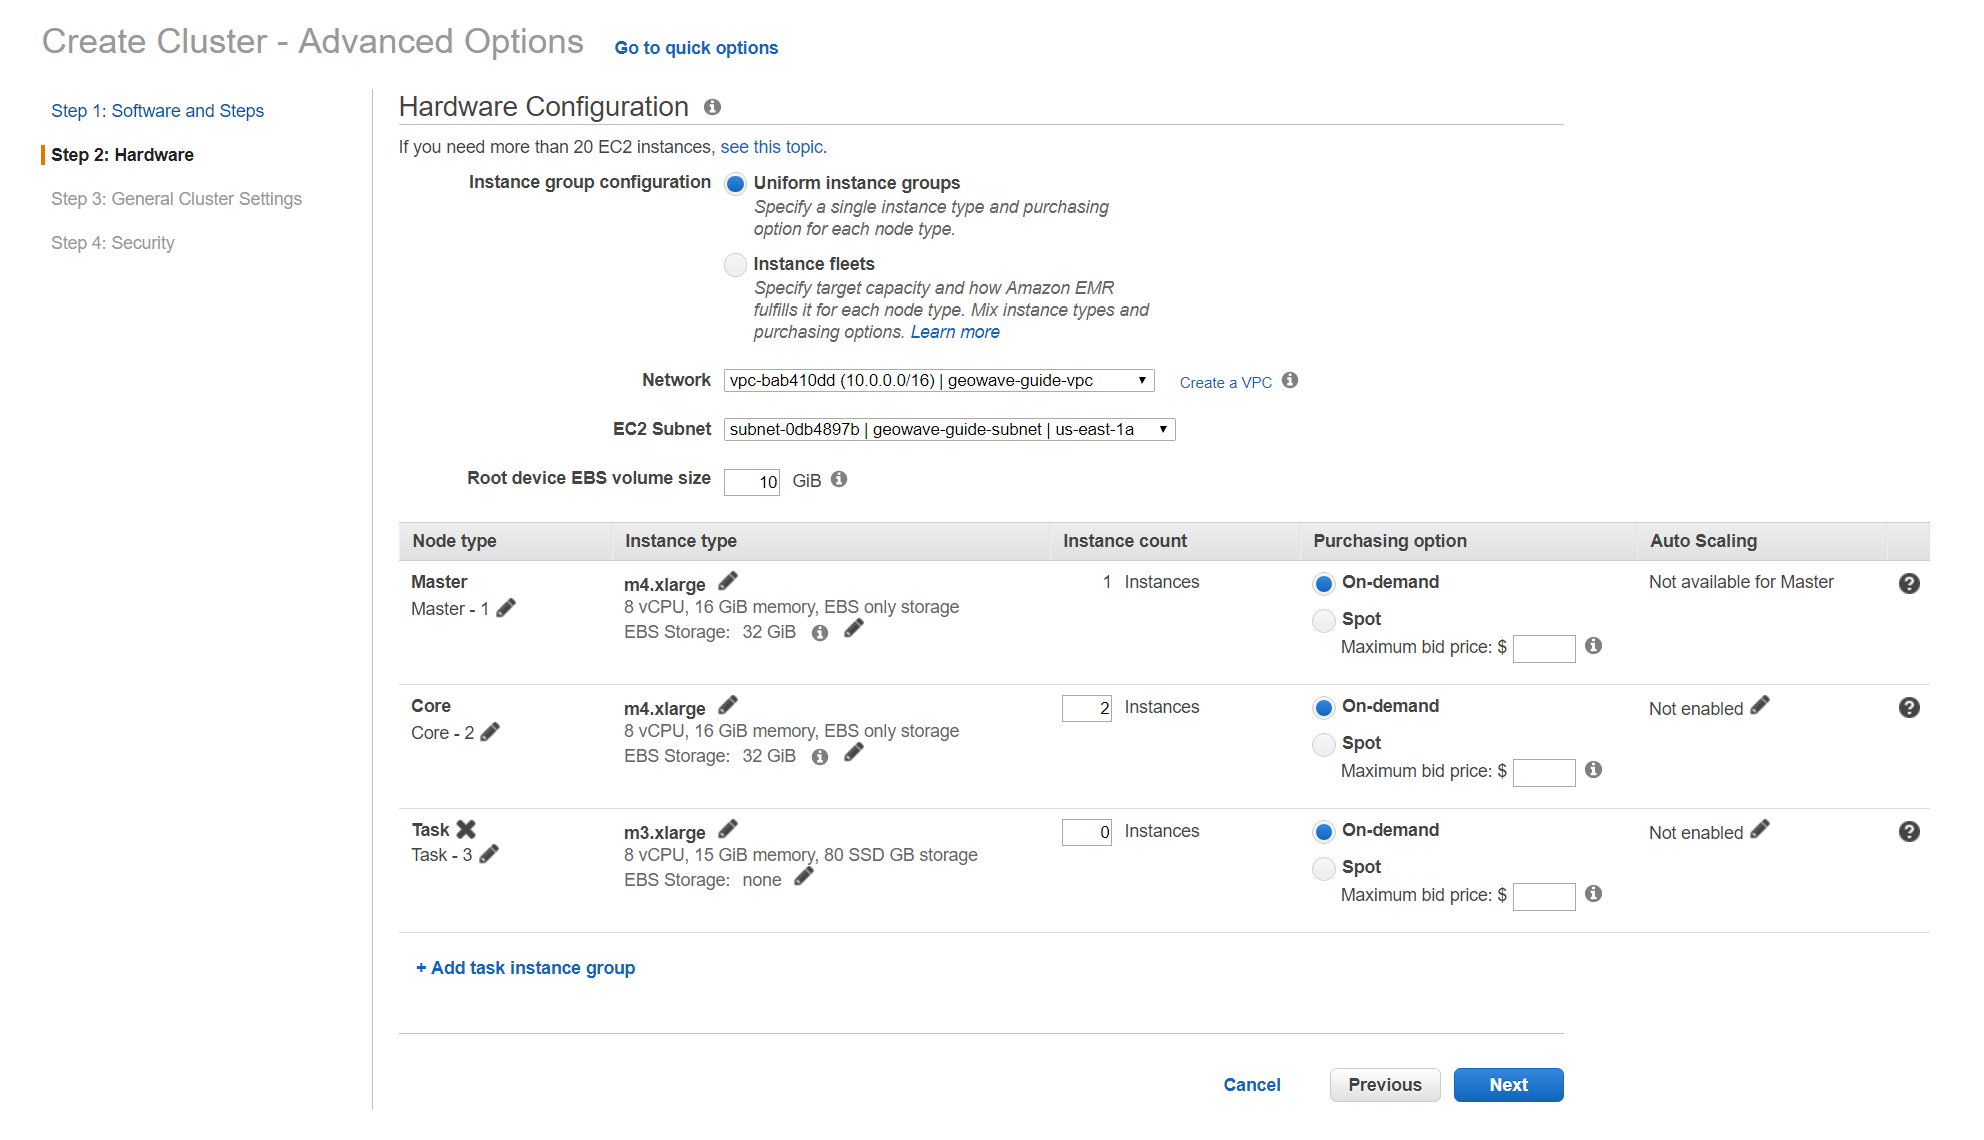
Hardware Configuration
-
Instance Group Configuration
-
Select Uniform Instance Groups
-
-
Network
-
Select your VPC
-
If you haven’t setup a VPC please see the Create EC2 VPC section here.
-
-
EC2 Subnet
-
Select the subnet (or one of the subnets) associated with your VPC
-
-
Root device EBS volume size
-
You can ignore this
-
-
Master
-
Edit the Instance Type to be m4.xlarge
-
Do not touch the EBS Storage
-
-
Core
-
Edit the Instance Type to be m4.xlarge
-
Select 2 for the Instance count
-
Do not touch the EBS Storage or Auto Scaling
-
-
Task
-
We won’t be using a task node in this walkthrough so leave the instance count at 0
-
---
|
You can request spot instances here to save money. Info and current pricing on spot instances can be found here. |
Step 3:
General Options
-
Cluster name
-
Enter the desired name for your cluster
-
Cluster names do not have to be unique
-
-
Logging
-
Leave selected
-
Click on the folder icon and select your bucket
-
-
Debugging
-
Leave selected
-
-
Termination Protection
-
Leave selected
-
-
Scale down behavior
-
Leave at default: "Terminate at instance hour"
-
-
Tags
-
Enter a tag name for your cluster
-
This is completely optional, but may make it easier to search for your cluster later on
-
Additional Options
-
EMRFS consistent view
-
Leave unselected
-
-
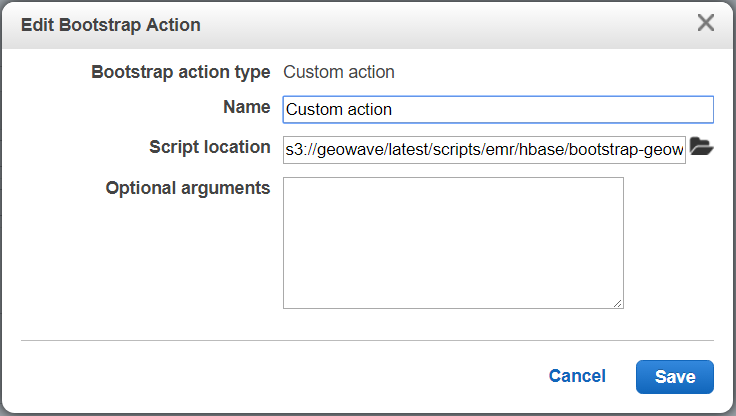
Bootstrap Actions:
-
Expand the Bootstrap Actions section
-
Select Custom action from the Add bootstrap action drop down list
-
Click the “Configure and add” button
-
-
Name
-
Enter a name for the custom action
-
This can be left as the default value of “Custom action”
-
-
Script location
-
Enter the location of your desired bootstrap script
-
Info on the bootstrap scripts and their locations can be found above
-
If you are using your own bucket to host the bootstrap script you can click on the folder icon to bring up a list of your available buckets and chose a script from there. Otherwise, type in the path to the script in the geowave bucket.
-
-
Click the “Add” button
---
Step 4:
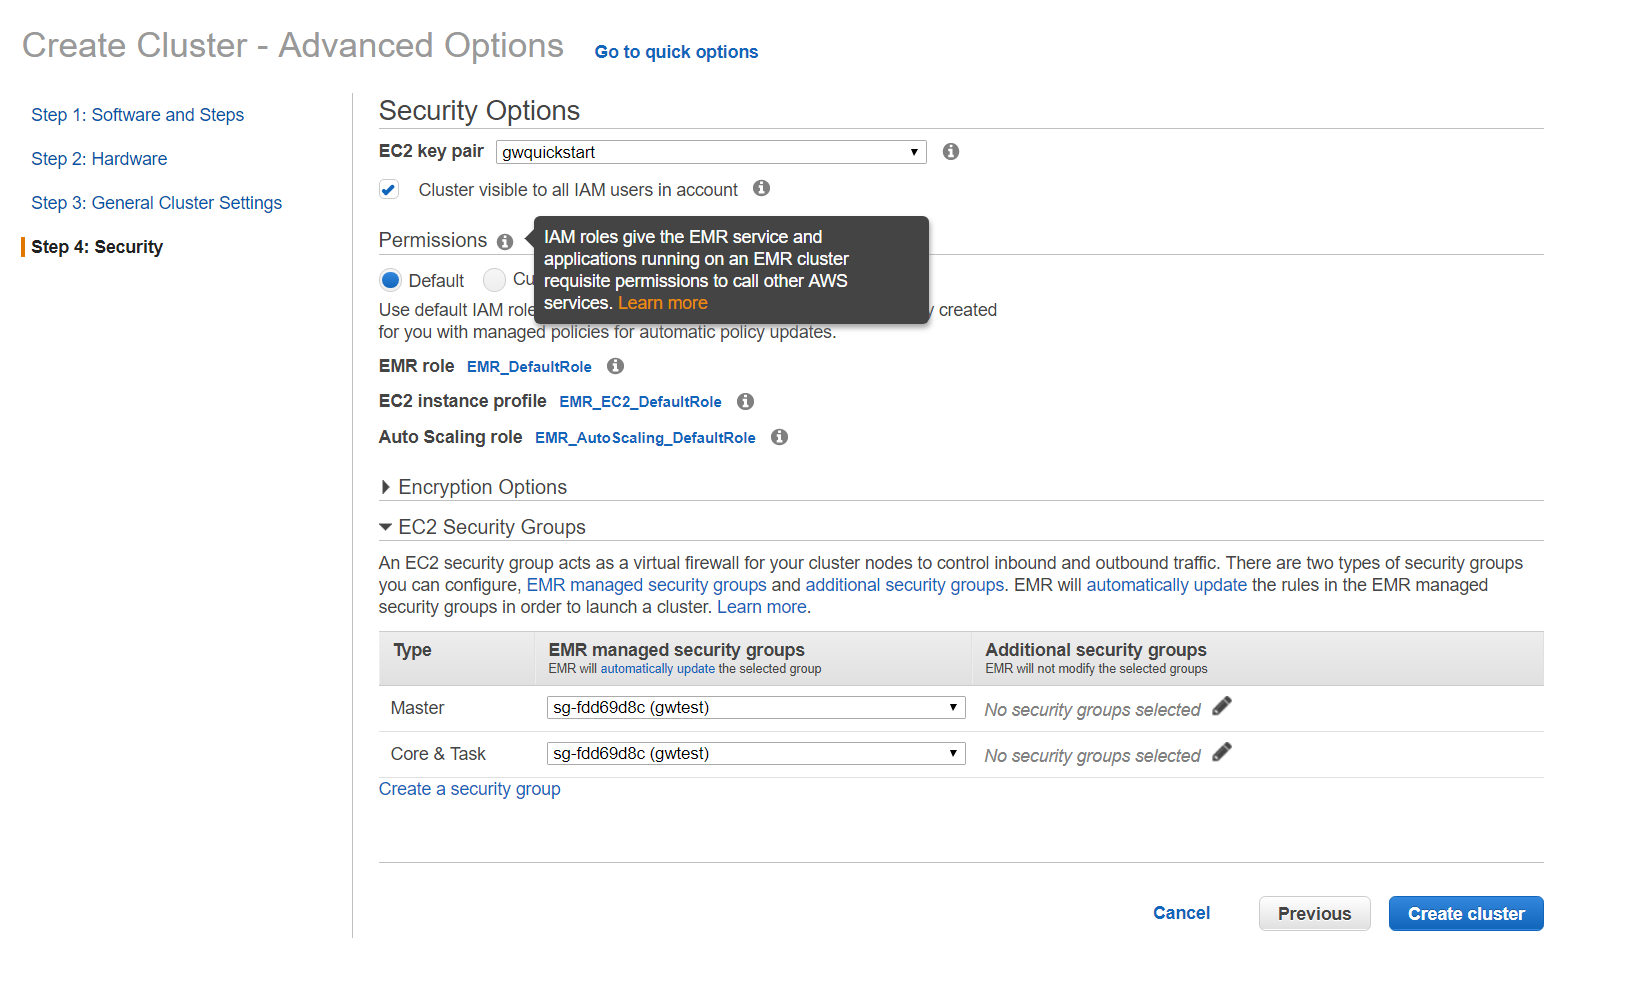
Security Options
-
EC2 key pair
-
Select your key pair for this cluster
-
If you haven’t created a key pair please see the Create EC2 Key Pair section here.
-
-
Cluster visible to all IAM users in account
-
Leave selected
-
-
Permissions
-
Leave “Default” selected
-
If you do not have permission to create roles, it is acceptable to select "Custom" and change the Auto Scaling role to "Proceed without role"
-
-
Ignore the Encryption Options
-
Expand the EC2 Security Groups section
-
Master: select your security group for the master node
-
Core & Task: select your security group for the core nodes
-
If you haven’t created a security group yet please see the Create EC2 Security Group section here.
-
---
Click the “Create Cluster” button to create and provision your cluster.
Please view the Connecting to the Cluster section of this document for description of how to connect to your provisioned cluster.
|
If you used the quickstart version of bootstrap script the script will now setup the environment, then download and process one month of GDELT data. The entire process takes approximately 25 minutes on a three node cluster. |
Enabling Jupyter Support
GeoWave also supports Jupyter notebook development which you can enable by following the steps here before creating the cluster.
Connecting to the Cluster
Once your cluster is running and bootstrapped, ssh into the cluster.
Go to the Cluster List (“Services” dropdown, select EMR) and click on the cluster you created. You will use the “Master public DNS” value as your hostname and the security key you assigned to the cluster to access it. If you are prompted for a login, the default name is hadoop.
If you are unsure of how to do this, click on the blue SSH link to the right of your Master public DNS to open a popup that will walk you though it.

|
The cluster status may show as waiting before the bootstrap script has completed. Please allow 5-7 minutes for the cluster to be setup and bootstrapped. This may take longer if you are using spot instances. |
If you are using Accumulo as your data store, the script will automatically create a geowave user with a password (geowave) and table creation permissions, as well as pointing Accumulo to the GeoWave JAR on HDFS.
Appendices
Create EC2 VPC (Network Interface/Subnet Id)
From the “Services” dropdown, select VPC. Then click on the “Start VPC Wizard” button.
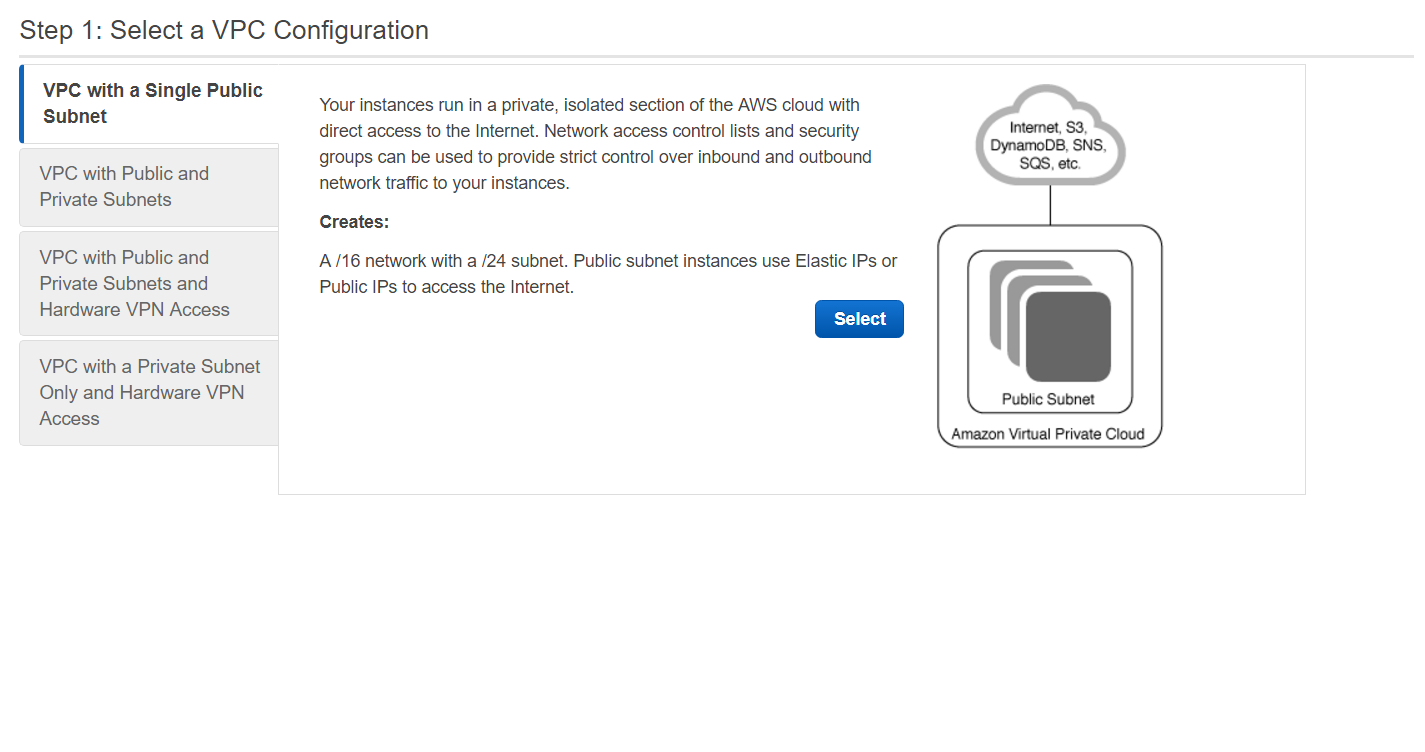
The default VPC setup is VPC with a single public subnet. This is what we will use for the example here, however other VPC setups will work as well.
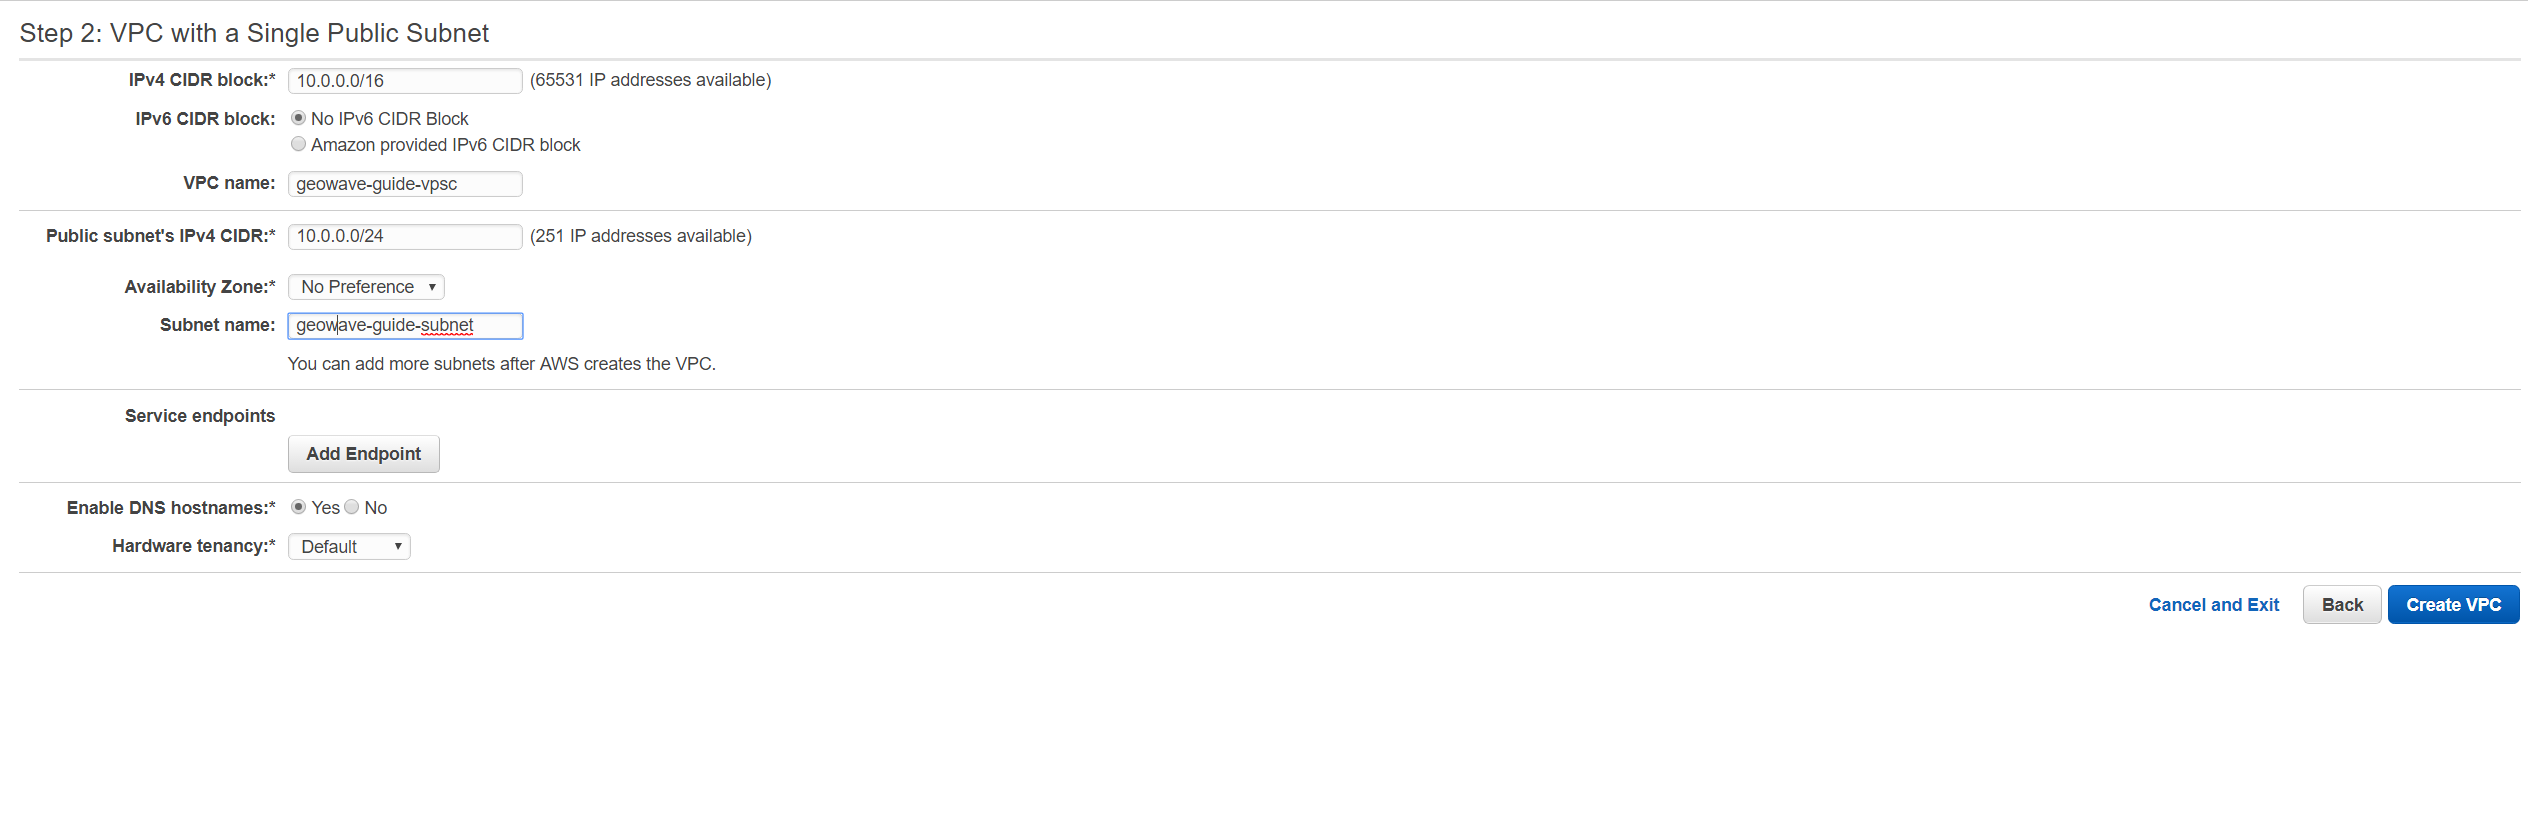
You can use the default values for everything in this step and create a useable VPC. We recommend that you add a VPC name and change the default Subnet name to make them both easier to identify later on.
Click the “Create VPC” button and after a short period of time you will receive a confirmation of your VPC creation.
Click the “Subnets” link on the left side of the page and find your new subnet.
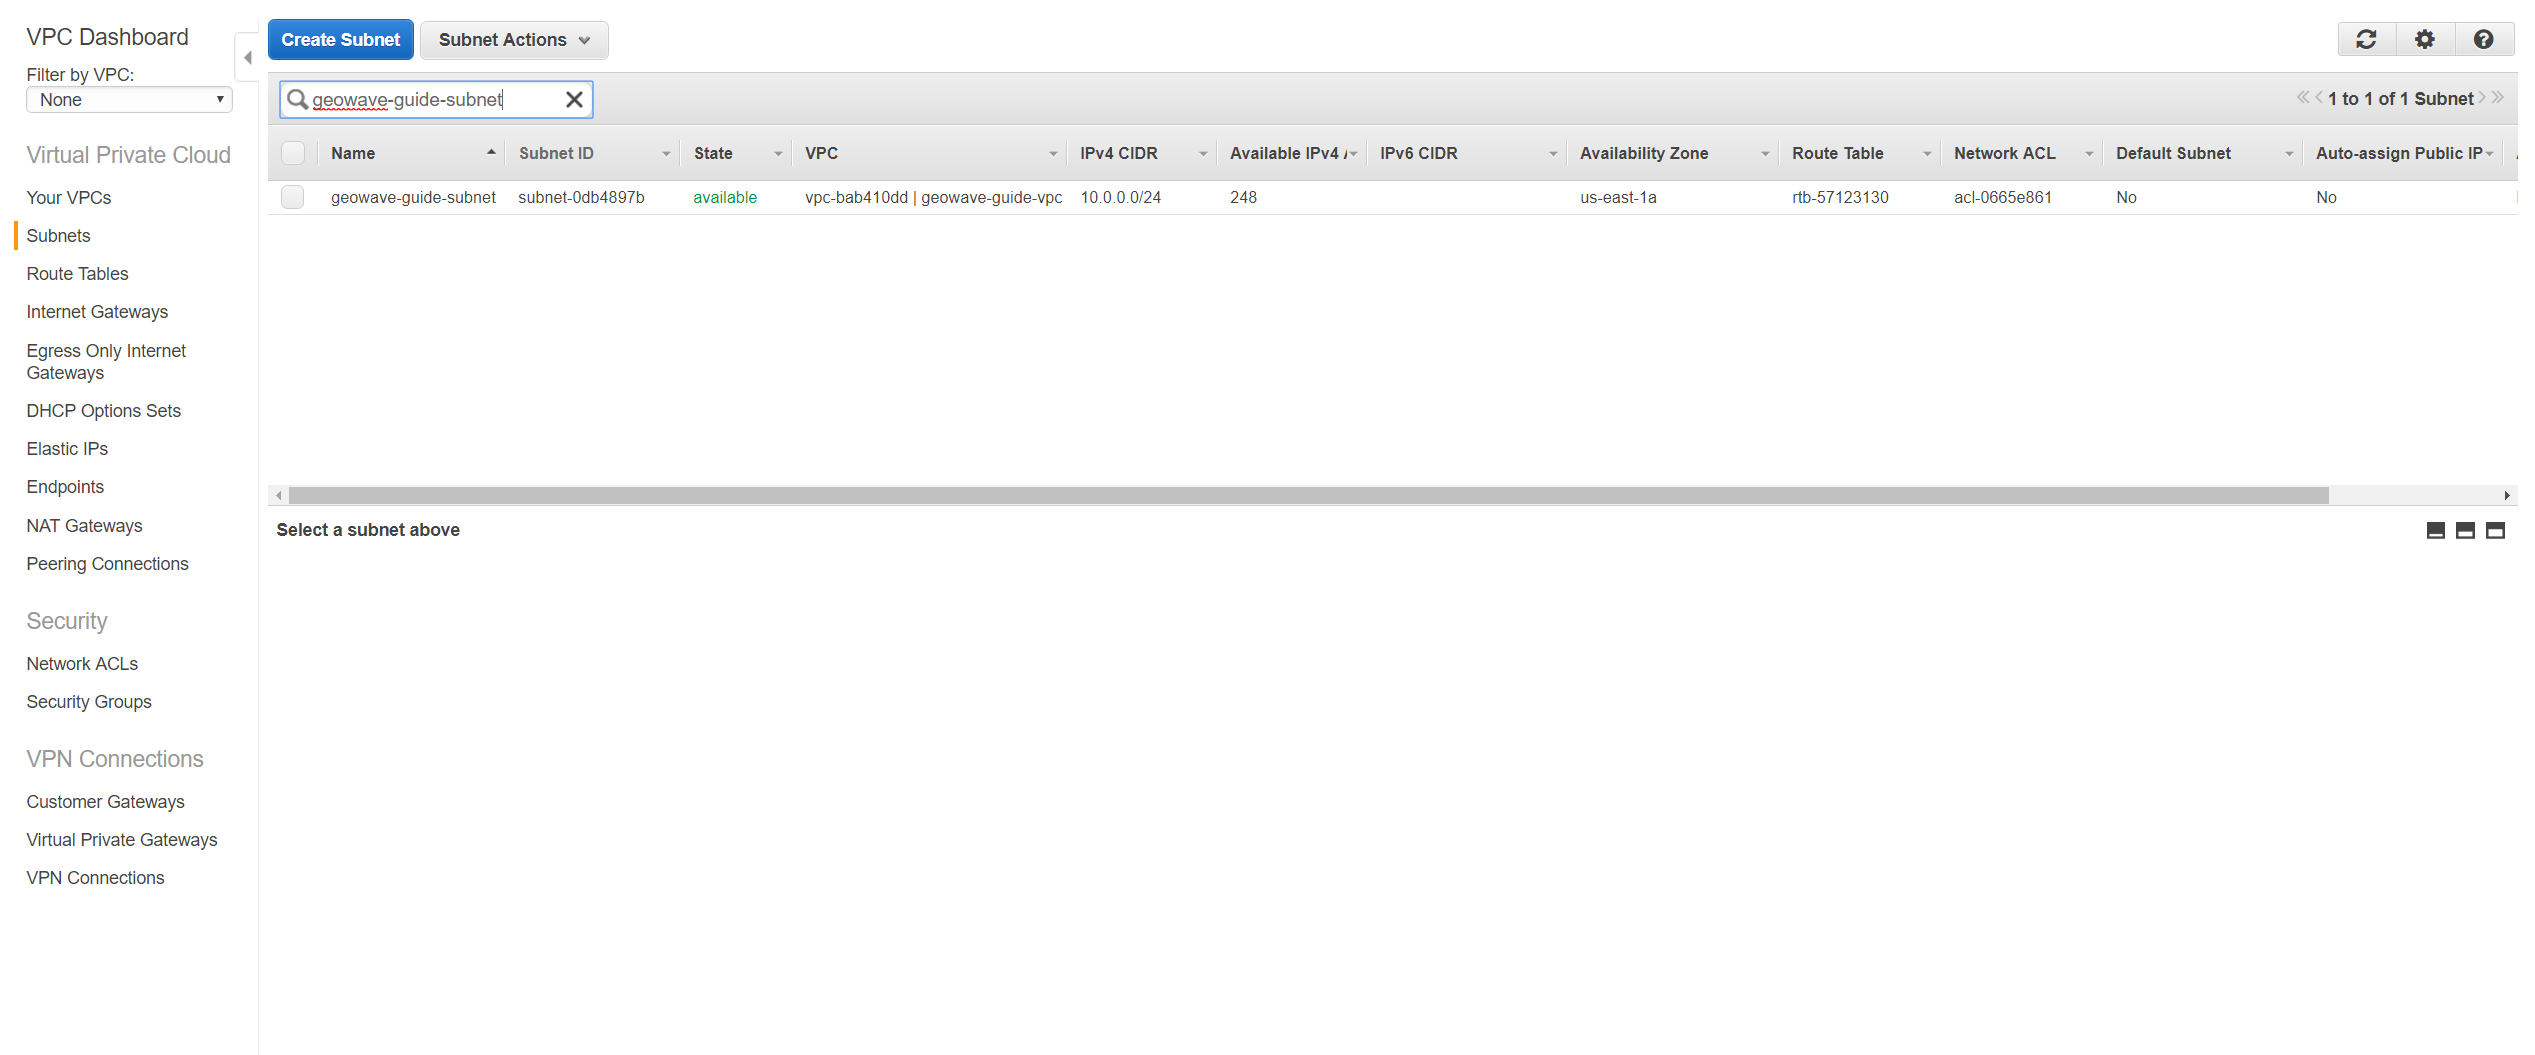
Record the Subnet ID. You will need it if you are using the AWS CLI method to create your cluster.
For a more detailed walkthough of creating an AWS VPC please see the Amazon documentation here.
Create AWS S3 Bucket
From the “Services” dropdown, select S3 then click the “Create Bucket” button.
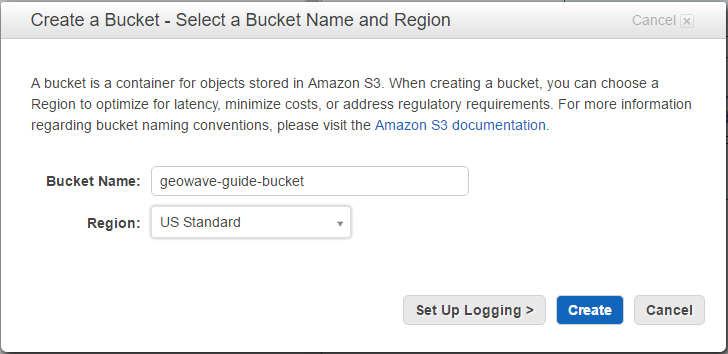
Enter your desired name for the bucket, select your region and click the “Create” button.
For more detailed information on creating and using S3 buckets please see the Amazon documentation here.
Upload to AWS S3 Bucket
From the “Services” dropdown, select S3. Navigate to the bucket that you plan to use and click on the blue "Upload" button.

You can drag/drop the desired scripts into this bucket, or navigate to your file by clicking "add files."
For more detailed information on uploading to S3 buckets please see the Amazon documentation here.
Create EC2 Key Pair
From the “Services” dropdown, select EC2. Then select the “Key Pairs” link on the left side of the page and click the “Create Key Pair” button.
|
Ensure that your selected region (top right side of the page) is the same as the one you will be creating you cluster in. Key pairs cannot be used across regions. |
Enter a name for the key pair in the popup and click the “Create” button.
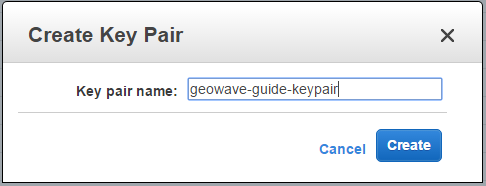
When you create the key pair Amazon will automatically begin to download your private key. Save this somewhere you will remember, because you will need it to ssh into your cluster.
For more detailed information on AWS EC2 Key Pairs please see the Amazon documentation here.
Create EC2 Security Group
From the “Services” dropdown, select EC2. Then select the “Security Groups” link on the left side of the page and click the “Create Security Group” button.
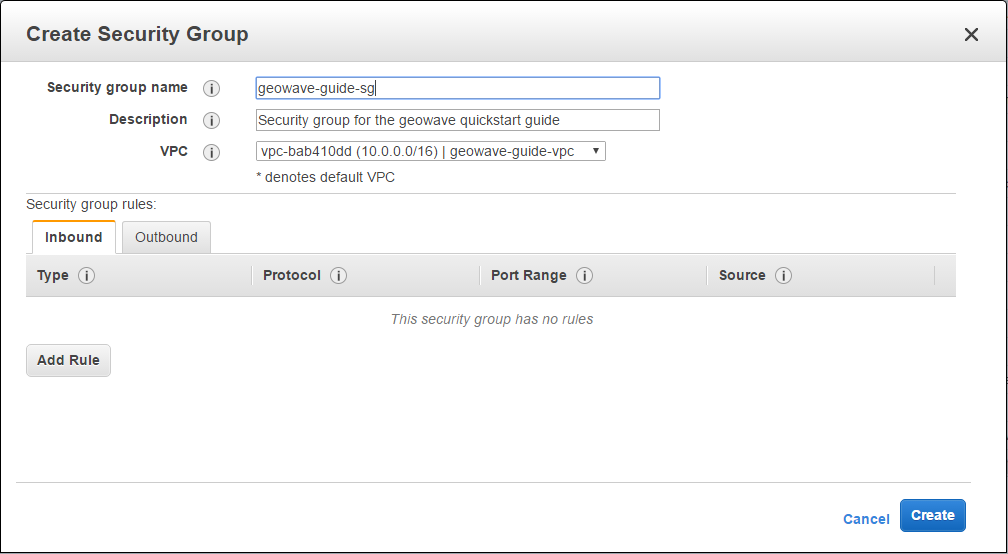
Enter a name for the security group, a description (if desired) and select the VPC to associate this security group with.
If you haven’t created a VPC please see the Create EC2 VPC section.
Click the “Create” button to create your security group.
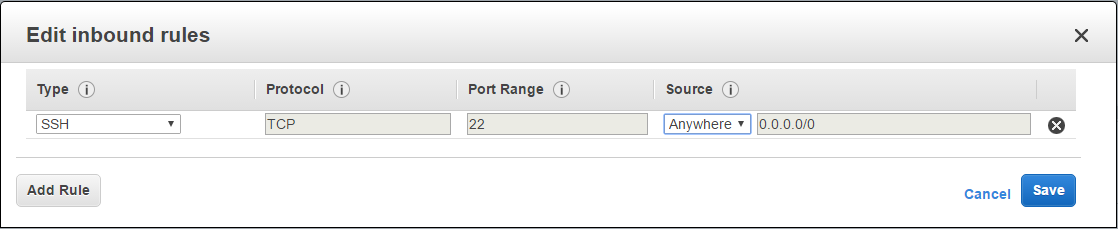
Select your security group from the list. Click on the “Inbound” tab towards the bottom of the page and click the “Edit” button.
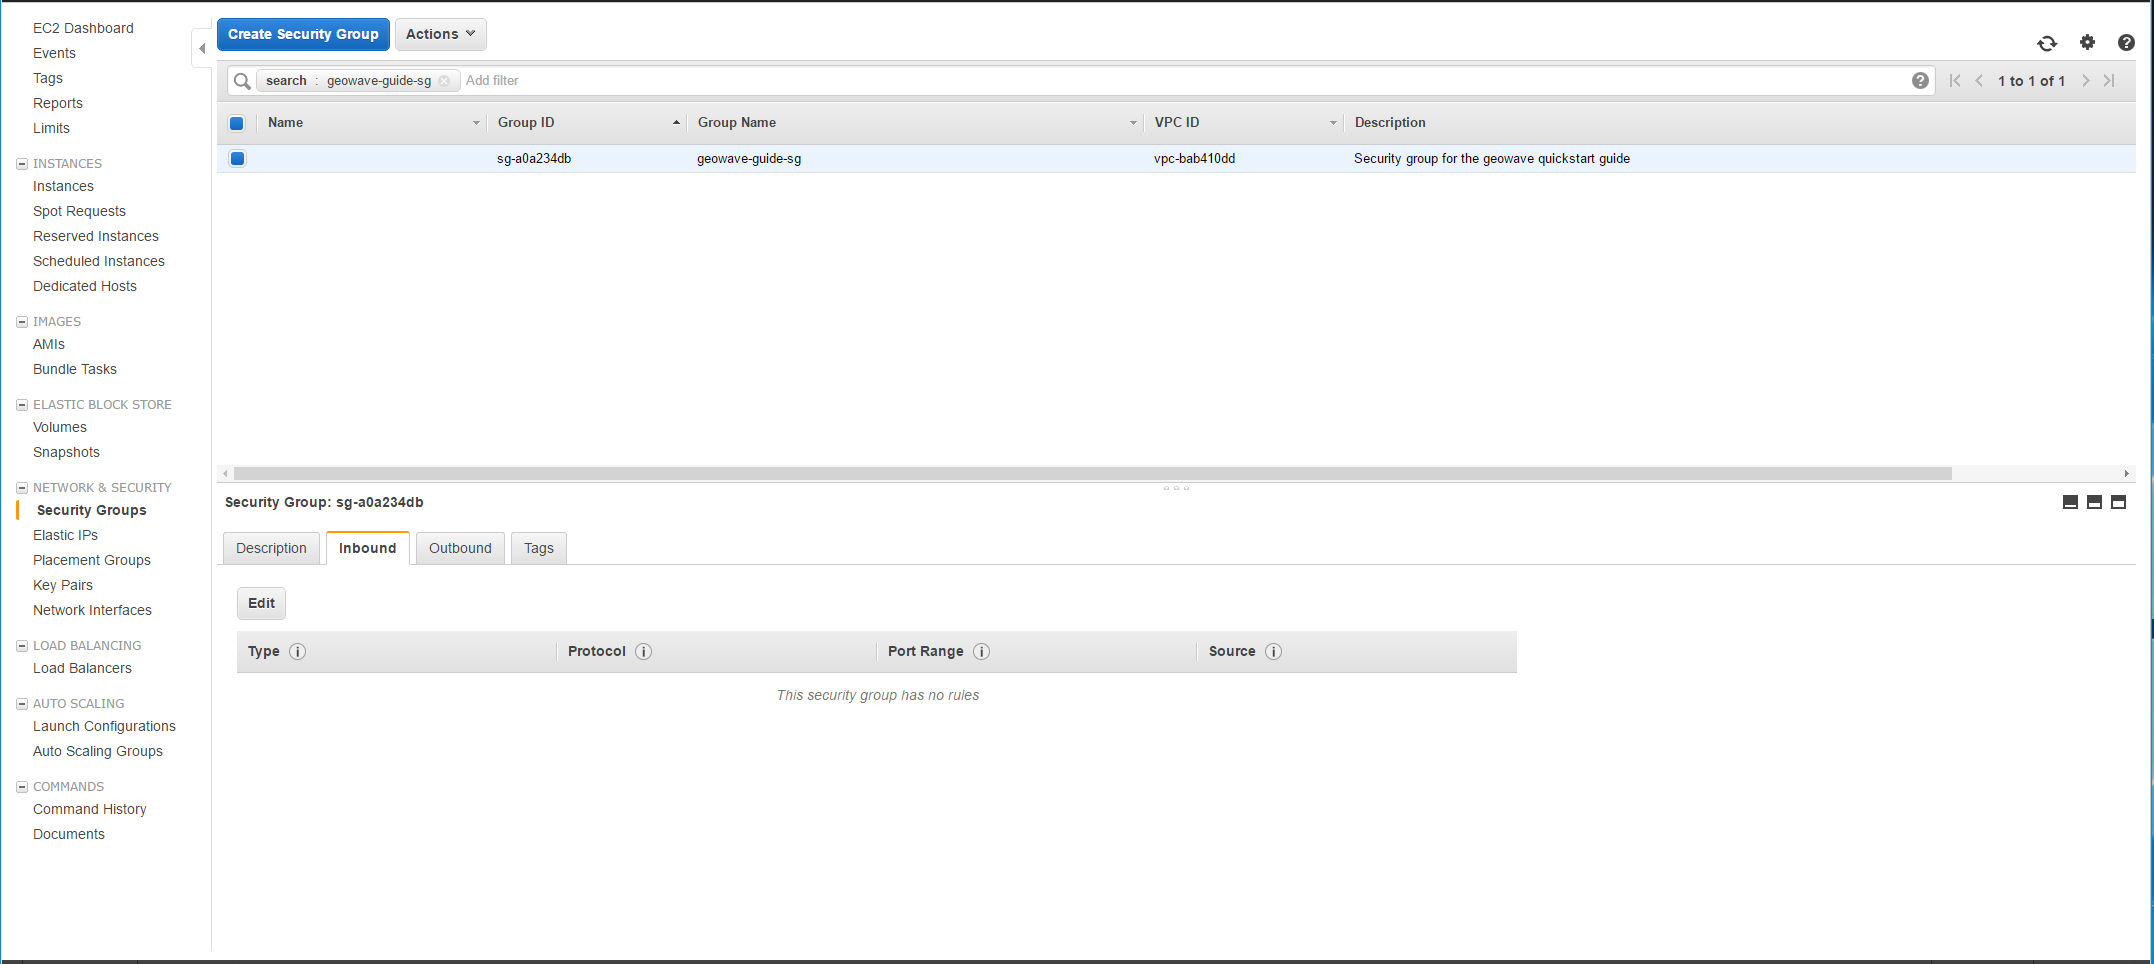
In the popup window, select SSH from the “Type” drop down, Anywhere from the “Source” drop down, then click the “Save” button.
For more detailed information on AWS EC2 Security Groups please see the Amazon documentation here.
AWS CLI Setup
Please see the Amazon documentation here.